No-Bake Cookie Butter Icebox Cake: Creamy Biscoff Dessert for Easy Entertaining
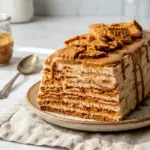
This No-Bake Cookie Butter Icebox Cake layers fluffy cookie butter cream with Lotus Biscoff cookies for a creamy, chilled dessert that softens overnight in the fridge. It is rich, make-ahead friendly, and perfect for easy entertaining.
- Prep Time: 15 minutes
- Inactive Time: 24 hours
- Total Time: 24 hours 15 minutes
- Yield: 8 servings 1x
- Category: Dessert
Ingredients
Scale
- 2 cups heavy cream
- 1/2 cup Lotus Biscoff spread, plus 1/3 cup more, warmed for serving
- 1/3 cup mascarpone cheese
- 1 teaspoon pure vanilla extract
- Pinch of kosher salt
- 2 tablespoons confectioner’s sugar
- 2 packages Lotus Biscoff cookies (32 cookies per package), plus extra if needed
Instructions
- Add the heavy cream to the bowl of a stand mixer fitted with the whisk attachment. Whip on medium-high speed until the cream reaches medium peaks. The texture should look thick, airy, and smooth, which gives No-Bake Cookie Butter Icebox Cake its light filling.
- Add the Biscoff spread, mascarpone, vanilla extract, kosher salt, and confectioner’s sugar to the whipped cream. Continue mixing until the mixture becomes fully combined and creamy. Scrape the bowl as needed so everything blends evenly. The final filling for No-Bake Cookie Butter Icebox Cake should look fluffy, rich, and smooth.
- Line a loaf pan with plastic wrap, leaving enough overhang on the sides to lift the dessert out later. Place a single layer of Biscoff cookies across the bottom of the pan. Fit them together as closely as possible so the base forms a solid layer. This helps No-Bake Cookie Butter Icebox Cake slice neatly later.
- Spread a layer of the cookie butter cream mixture over the cookies. Aim for a thickness similar to the cookie layer so the dessert stays balanced. Use a spatula to smooth it out all the way to the edges. Repeat the layering process, alternating cookies and cream, until the loaf pan is full. End with a layer of cookies on top so the dessert can be inverted cleanly. This structure is what gives No-Bake Cookie Butter Icebox Cake its signature look.
- Cover the pan loosely but securely with plastic wrap and refrigerate for at least 24 hours. This chilling time is essential because it softens the cookies and allows the layers to set. For the best texture, let No-Bake Cookie Butter Icebox Cake chill overnight before serving.
- When ready to serve, lift the cake out of the loaf pan using the plastic wrap and transfer it to a serving plate or tray. Drizzle the warmed Biscoff spread over the top and finish with crushed cookies. Serve chilled, or let it sit at room temperature for about 10 minutes if you want a softer, creamier bite. That final touch makes No-Bake Cookie Butter Icebox Cake look and taste extra special.
Notes
- Nutrition facts are estimated using about 45 cookies. The exact cookie count can vary depending on the shape of your loaf pan.
- A straight-sided loaf pan usually uses about 9 cookies per layer.
- Extra cookies are great for topping and finishing.
- To warm the cookie butter, microwave it in 30-second bursts and stir between each interval until smooth.
- Chill the dessert for at least 24 hours or up to 3 days.
- Store leftovers in an airtight container in the fridge for up to 3 days.
- To freeze, wrap the cake tightly and thaw it overnight in the refrigerator before serving.
Nutrition
- Calories: 370kcal
- Sugar: 10g
- Sodium: 42mg
- Fat: 33g
- Carbohydrates: 16g
- Protein: 4g
- Cholesterol: 77mg
Find it online: https://irmacooks.com/no-bake-cookie-butter-icebox-cake/
