Dessert magic does not always need an oven. No-Bake Cookie Butter Icebox Cake proves that a chilled loaf pan, a handful of cookies, and a dreamy cookie butter cream can create something that looks fancy, tastes luxurious, and asks almost nothing from you in return.
That is the beauty of this dessert. It leans into ease without tasting lazy. It feels elegant without acting fussy. And it delivers that sweet-spiced, caramelized flavor Biscoff lovers cannot stop talking about. Every slice of No-Bake Cookie Butter Icebox Cake feels like a little celebration, even if the only thing you are celebrating is surviving Tuesday.
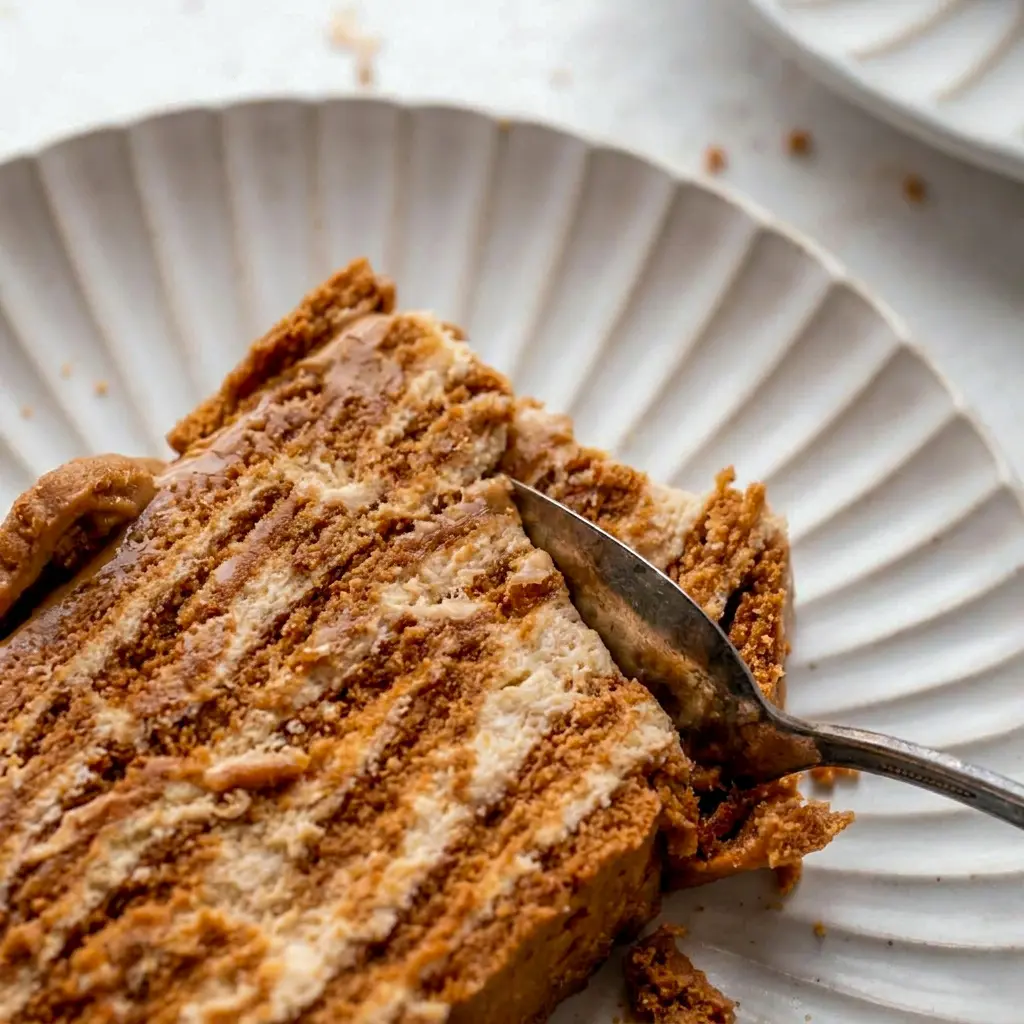
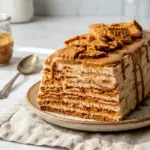
The first time I tasted an icebox cake like this, I understood the obsession immediately. The cookies softened just enough overnight to become tender and cake-like, but they still kept a little structure. The filling turned fluffy and rich, almost like mousse, but lighter. The whole dessert melted together into this layered, creamy, spoon-quiet kind of bliss. That is exactly what No-Bake Cookie Butter Icebox Cake does best.
It also has that rare dessert superpower: it makes people think you worked way harder than you did. The fridge does most of the heavy lifting. You do the layering, the chilling, and the dramatic grand reveal. That is it. No-Bake Cookie Butter Icebox Cake is a showstopper with a shockingly short to-do list.
This one is also a dream for make-ahead moments. Holiday dinner? Covered. Birthday dessert? Absolutely. Potluck? Bring it. Family gathering? Everyone will ask for the recipe. That is why No-Bake Cookie Butter Icebox Cake keeps earning a permanent spot in dessert rotations. It does not just taste good. It behaves beautifully.
And then there is the flavor. Biscoff cookies bring that warm spiced note, a little caramel, a little cinnamon, and a lot of personality. Cookie butter folds into the whipped cream and turns every bite into something rich and cloud-like. The mascarpone adds a silky tang that keeps the sweetness in check. Together, they make No-Bake Cookie Butter Icebox Cake feel indulgent without becoming heavy.
This is the kind of dessert that belongs in your back pocket for every occasion. It is a smart Biscoff Icebox Cake No Bake option, a crowd-pleasing No Bake Biscoff Icebox Cake, and one of those Biscoff Icebox Cake recipes that disappears fast. It also lands beautifully as a Biscoff Cookie Icebox Cake, a luscious Biscoff Cookie Butter Icebox Cake, a helpful guide on How To Make Biscoff Icebox Cake, a classic Speculoos Icebox Cake, a rich Speculoos Cookie Butter Cake Recipe, and a slightly more decadent Mascarpone Biscoff Icebox Cake. In short, No-Bake Cookie Butter Icebox Cake knows exactly how to show up and steal the dessert table.
Table of Contents
Why You’ll Love This No-Bake Cookie Butter Icebox Cake
No-Bake Cookie Butter Icebox Cake checks all the right boxes.
It does not require baking.
It can be made ahead.
It slices beautifully after chilling.
It tastes creamy, spiced, and luxurious.
It looks impressive with very little effort.
That last part matters more than people admit. A lot of desserts are delicious, but they also demand a full production. No-Bake Cookie Butter Icebox Cake keeps things simple. You layer, chill, unmold, and serve. That easy rhythm makes it perfect for busy hosts, casual bakers, and anyone who wants dessert to feel joyful instead of stressful.
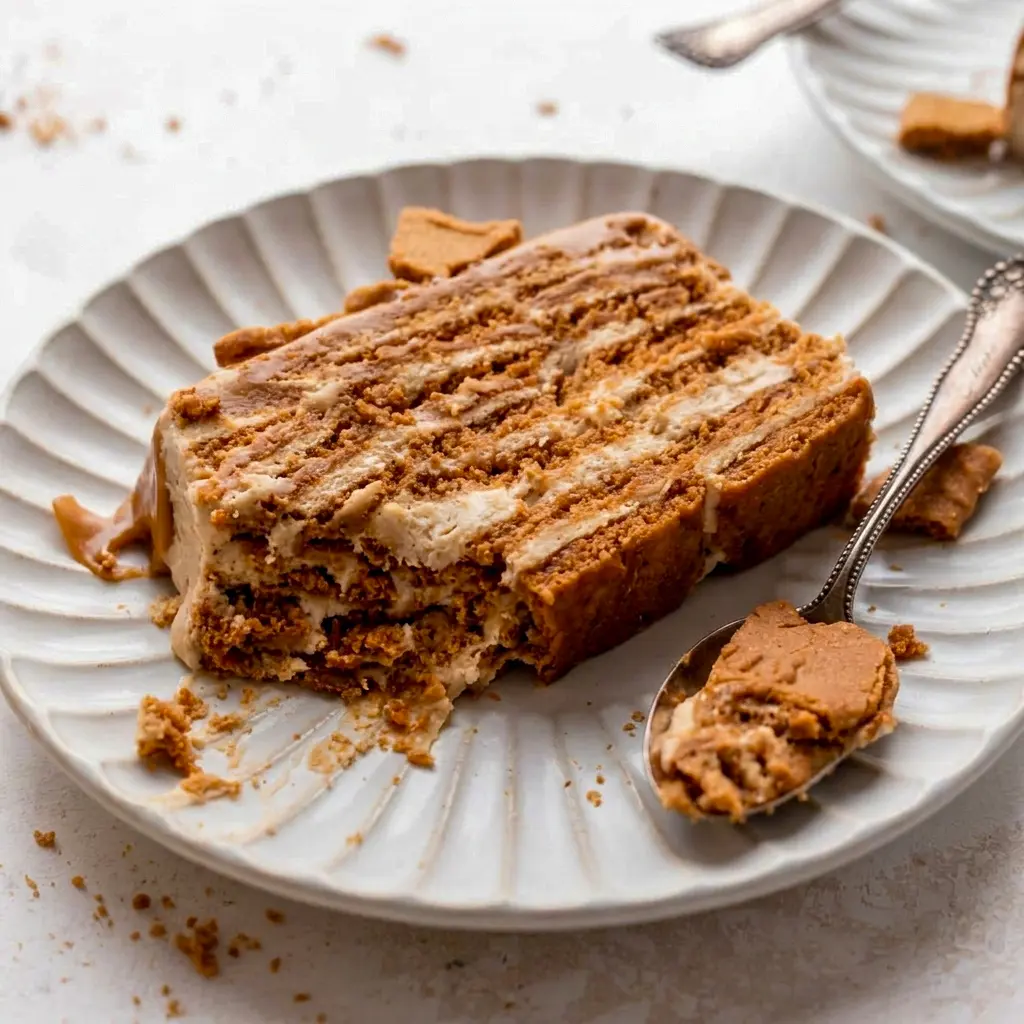
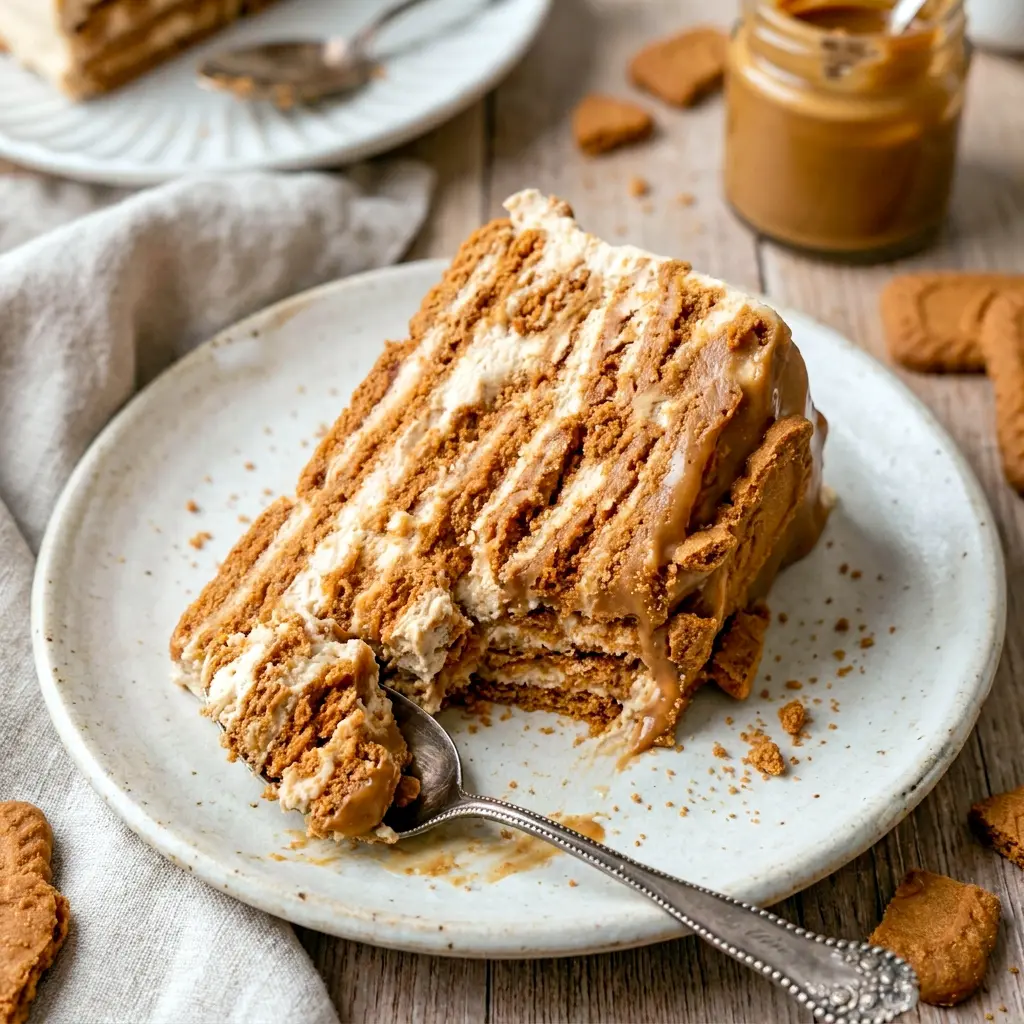
The texture is another big reason to love it. The whipped cream stays airy. The cookie butter brings depth. The cookies soften into a tender, cake-like layer that slices cleanly and tastes like it took far more skill than it did. No-Bake Cookie Butter Icebox Cake hits that sweet spot between light and rich.
It also adapts well to your serving style. You can top it with warmed cookie butter, extra crushed cookies, berries, or a dusting of cookie crumbs. Every version still feels special. That flexibility is a big reason No-Bake Cookie Butter Icebox Cake works for everything from weeknight cravings to holiday tables.
And yes, it absolutely delivers on that “everyone wants seconds” promise. This is not a polite dessert that sits quietly in the corner. No-Bake Cookie Butter Icebox Cake disappears. Fast.
The Key Ingredients (and Why You Need Them)
Below I list the main ingredients with no amounts here — the printable recipe card has those. I’ll explain what each one does so you can see why No-Bake Cookie Butter Icebox Cake works so well and how to tweak it with confidence.
- Heavy cream
This whips into the fluffy base that gives No-Bake Cookie Butter Icebox Cake its cloud-like texture. It makes the filling feel light even though the dessert tastes rich. - Lotus Biscoff spread
This is the flavor star. It brings sweet spice, caramel notes, and that unmistakable cookie butter taste that defines No-Bake Cookie Butter Icebox Cake. - Mascarpone cheese
Mascarpone adds creaminess and a gentle tang. It keeps No-Bake Cookie Butter Icebox Cake from tasting too sweet and gives the filling a lush, velvety finish. - Vanilla extract
Vanilla rounds out the cookie butter flavor and adds warmth. It helps No-Bake Cookie Butter Icebox Cake taste polished and complete. - Kosher salt
Just a pinch sharpens the sweetness and makes the flavor deeper. Salt matters more than people think in No-Bake Cookie Butter Icebox Cake. - Confectioner’s sugar
This lightly sweetens the whipped cream and helps the filling stay smooth. It blends in easily, which is exactly what No-Bake Cookie Butter Icebox Cake needs. - Lotus Biscoff cookies
These are the structure and the signature crunch. After chilling, they soften into tender layers that make No-Bake Cookie Butter Icebox Cake feel almost like a chilled cake. - Warm cookie butter for serving
This is the finishing touch. A drizzle over the top gives No-Bake Cookie Butter Icebox Cake a glossy, dramatic look and a little extra indulgence.
How to Make It
The process for No-Bake Cookie Butter Icebox Cake is simple, but the layers matter. Build it carefully, chill it fully, and the payoff will be huge.
- Whip the cream first.
Pour the heavy cream into the bowl of a stand mixer fitted with the whisk attachment. Whip it until medium peaks form. You want the cream to look thick and billowy, not loose. This gives No-Bake Cookie Butter Icebox Cake its airy texture. - Add the cookie butter and flavorings.
Add the Biscoff spread, mascarpone, vanilla extract, salt, and confectioner’s sugar. Whip again until everything blends into a smooth, creamy filling. The mixture should look rich but still soft. This is the heart of No-Bake Cookie Butter Icebox Cake. - Prepare the loaf pan.
Line a loaf pan with plastic wrap, leaving enough overhang on the sides so you can lift the dessert out later. This step makes unmolding easier and keeps No-Bake Cookie Butter Icebox Cake looking neat when it is time to serve. - Build the first cookie layer.
Place a single layer of Biscoff cookies on the bottom of the pan. Try to fit them snugly so the base is even. This creates the foundation of No-Bake Cookie Butter Icebox Cake. - Spread on the cream layer.
Add a layer of the cookie butter cream mixture over the cookies. Aim for a thickness that feels close to the cookie layer below it. Smooth it out gently so the layers stay even. This is what gives No-Bake Cookie Butter Icebox Cake its beautiful striped look once sliced. - Repeat the layering.
Continue alternating cookies and cream until you reach the top of the pan. Finish with a layer of cookies on top. That final cookie layer becomes the base once the dessert is inverted. It also helps No-Bake Cookie Butter Icebox Cake hold its shape. - Wrap and chill.
Cover the loaf pan tightly with plastic wrap and refrigerate for at least 24 hours. This resting time is essential. It softens the cookies, sets the filling, and transforms the whole thing into true No-Bake Cookie Butter Icebox Cake territory. - Unmold and finish.
When ready to serve, lift the cake out using the plastic wrap and place it on a plate or tray. Drizzle warm cookie butter over the top and scatter crushed Biscoff cookies over everything. That finishing touch makes No-Bake Cookie Butter Icebox Cake look bakery-worthy.
Pro Tips for Perfect Results
No-Bake Cookie Butter Icebox Cake is easy, but a few smart moves make it even better.
Do not rush the chill time.
A full 24 hours gives the cookies time to soften properly and the filling time to set. That overnight rest is non-negotiable if you want the best No-Bake Cookie Butter Icebox Cake texture.
Use a straight-sided loaf pan when possible.
A straight-sided pan makes layering easier and helps the finished cake unmold cleanly. Different pans may change how many cookies you need for No-Bake Cookie Butter Icebox Cake.
Warm the cookie butter gently.
A few short microwave bursts are enough. Stir between intervals so it stays smooth and pourable for the topping on No-Bake Cookie Butter Icebox Cake.
Taste the filling before assembling.
Cookie butter sweetness can vary. A quick taste helps you decide whether you want a little more sugar or a touch more salt in No-Bake Cookie Butter Icebox Cake.
Serve it slightly softened.
Let the cake sit out for about 10 minutes before slicing if you want a creamier texture. That tiny pause helps No-Bake Cookie Butter Icebox Cake taste even more luscious.
Easy Variations to Try
The classic version is hard to beat, but No-Bake Cookie Butter Icebox Cake leaves plenty of room for fun twists.
Add berries on top.
Fresh raspberries or sliced strawberries bring brightness and a little freshness. That makes No-Bake Cookie Butter Icebox Cake feel lighter and more balanced.
Swap in Nutella or peanut butter.
The flavor will change, but the structure still works. This gives No-Bake Cookie Butter Icebox Cake a different personality while keeping the same no-bake ease.
Make it extra decadent.
Add more crushed cookies between layers or drizzle more warmed spread over each slice. That version of No-Bake Cookie Butter Icebox Cake is for serious dessert days.
Turn it into a trifle-style dessert.
No loaf pan? Use a dish and layer it as a scoopable dessert. The flavor still stays true to No-Bake Cookie Butter Icebox Cake.
Try a mascarpone-forward filling.
The mascarpone already adds richness, but you can lean into that profile for a more refined Mascarpone Biscoff Icebox Cake feel.
Best Ways to Serve It
No-Bake Cookie Butter Icebox Cake tastes best chilled, but it also shines with a little garnish.
Serve it with warm cookie butter drizzled over the top.
Add crushed Biscoff cookies for texture.
Top with fresh berries for a slightly lighter finish.
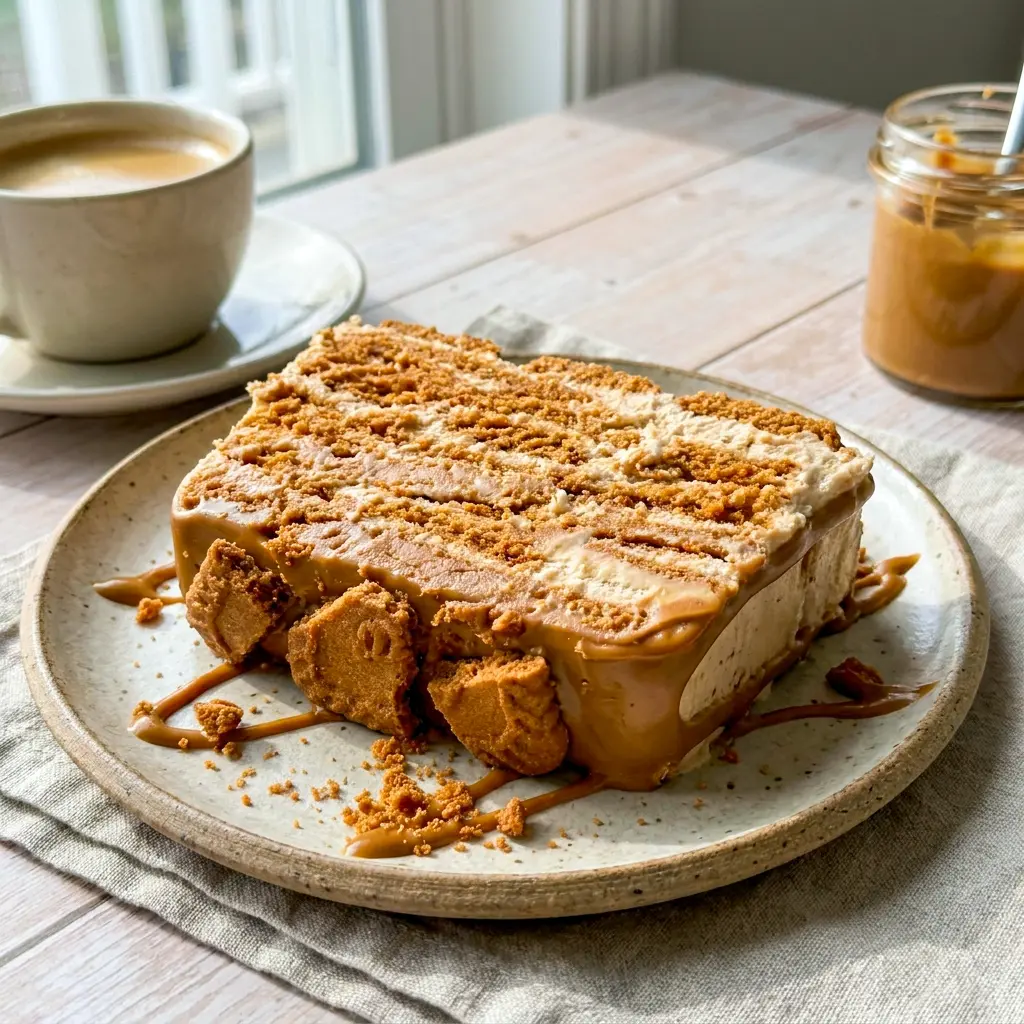
Offer it alongside coffee or tea for a cozy dessert moment.
It works beautifully after a big meal because it feels rich without becoming overly heavy. That is one of the best things about No-Bake Cookie Butter Icebox Cake. It looks indulgent, but the chilled texture keeps it from feeling clunky.
For a party, slice it thick and let each piece show off those layers. That visual payoff is part of the fun. No-Bake Cookie Butter Icebox Cake loves a dramatic reveal.
Storage and Leftovers
No-Bake Cookie Butter Icebox Cake stores well, which is excellent news for future dessert cravings.
Keep leftovers covered and refrigerated for up to 3 days. The texture stays best when the cake stays cold and wrapped tightly.
You can also freeze it if needed. Wrap it well, freeze it, then thaw it overnight in the fridge before serving. The texture may shift slightly, but it still holds up surprisingly well.
For the best leftovers, slice only what you need and return the rest to the fridge right away. That keeps it neat and creamy.
FAQs
What is the difference between Biscoff and Speculoos?
They are essentially the same thing. Biscoff is the brand name, while speculoos refers to the spiced cookie style and spread. That is why Speculoos Icebox Cake and No-Bake Cookie Butter Icebox Cake often describe the same dessert family.
Can I make No-Bake Cookie Butter Icebox Cake ahead of time?
Absolutely. In fact, it works best when made ahead. A full overnight chill is ideal for No-Bake Cookie Butter Icebox Cake.
Can I use a different pan?
Yes. A loaf pan gives the classic look, but you can adapt the recipe to another shape if needed. Just adjust the cookie count and layering as necessary for No-Bake Cookie Butter Icebox Cake.
Does the dessert taste overly sweet?
Not really. The mascarpone and pinch of salt help balance the cookie butter, so it stays rich without becoming cloying.
Can I replace the mascarpone?
You can, though the texture and flavor will shift a little. Mascarpone adds a smooth, elegant finish that makes this cake especially dreamy.
Final Thoughts
No-Bake Cookie Butter Icebox Cake is the kind of dessert that earns trust fast. It is simple to assemble, beautiful to serve, and full of that warm, spiced Biscoff flavor people love. It gives you all the drama of a layered dessert without making you turn on the oven or babysit a complicated recipe.
It also feels wonderfully versatile. Make it for a holiday, a dinner party, a family gathering, or just because your sweet tooth is being a little dramatic. This cake handles them all with style.
The best part might be how effortlessly impressive it is. You chill it, unmold it, slice it, and watch everybody light up. That is the kind of dessert victory worth repeating.
Follow me on Pinterest for daily new recipes.
No-Bake Cookie Butter Icebox Cake: Creamy Biscoff Dessert for Easy Entertaining
This No-Bake Cookie Butter Icebox Cake layers fluffy cookie butter cream with Lotus Biscoff cookies for a creamy, chilled dessert that softens overnight in the fridge. It is rich, make-ahead friendly, and perfect for easy entertaining.
- Prep Time: 15 minutes
- Inactive Time: 24 hours
- Total Time: 24 hours 15 minutes
- Yield: 8 servings 1x
- Category: Dessert
Ingredients
- 2 cups heavy cream
- 1/2 cup Lotus Biscoff spread, plus 1/3 cup more, warmed for serving
- 1/3 cup mascarpone cheese
- 1 teaspoon pure vanilla extract
- Pinch of kosher salt
- 2 tablespoons confectioner’s sugar
- 2 packages Lotus Biscoff cookies (32 cookies per package), plus extra if needed
Instructions
- Add the heavy cream to the bowl of a stand mixer fitted with the whisk attachment. Whip on medium-high speed until the cream reaches medium peaks. The texture should look thick, airy, and smooth, which gives No-Bake Cookie Butter Icebox Cake its light filling.
- Add the Biscoff spread, mascarpone, vanilla extract, kosher salt, and confectioner’s sugar to the whipped cream. Continue mixing until the mixture becomes fully combined and creamy. Scrape the bowl as needed so everything blends evenly. The final filling for No-Bake Cookie Butter Icebox Cake should look fluffy, rich, and smooth.
- Line a loaf pan with plastic wrap, leaving enough overhang on the sides to lift the dessert out later. Place a single layer of Biscoff cookies across the bottom of the pan. Fit them together as closely as possible so the base forms a solid layer. This helps No-Bake Cookie Butter Icebox Cake slice neatly later.
- Spread a layer of the cookie butter cream mixture over the cookies. Aim for a thickness similar to the cookie layer so the dessert stays balanced. Use a spatula to smooth it out all the way to the edges. Repeat the layering process, alternating cookies and cream, until the loaf pan is full. End with a layer of cookies on top so the dessert can be inverted cleanly. This structure is what gives No-Bake Cookie Butter Icebox Cake its signature look.
- Cover the pan loosely but securely with plastic wrap and refrigerate for at least 24 hours. This chilling time is essential because it softens the cookies and allows the layers to set. For the best texture, let No-Bake Cookie Butter Icebox Cake chill overnight before serving.
- When ready to serve, lift the cake out of the loaf pan using the plastic wrap and transfer it to a serving plate or tray. Drizzle the warmed Biscoff spread over the top and finish with crushed cookies. Serve chilled, or let it sit at room temperature for about 10 minutes if you want a softer, creamier bite. That final touch makes No-Bake Cookie Butter Icebox Cake look and taste extra special.
Notes
- Nutrition facts are estimated using about 45 cookies. The exact cookie count can vary depending on the shape of your loaf pan.
- A straight-sided loaf pan usually uses about 9 cookies per layer.
- Extra cookies are great for topping and finishing.
- To warm the cookie butter, microwave it in 30-second bursts and stir between each interval until smooth.
- Chill the dessert for at least 24 hours or up to 3 days.
- Store leftovers in an airtight container in the fridge for up to 3 days.
- To freeze, wrap the cake tightly and thaw it overnight in the refrigerator before serving.
Nutrition
- Calories: 370kcal
- Sugar: 10g
- Sodium: 42mg
- Fat: 33g
- Carbohydrates: 16g
- Protein: 4g
- Cholesterol: 77mg