Healthy Homemade Butterfingers | Easy Gluten-Free & Dairy-Free Candy Bites
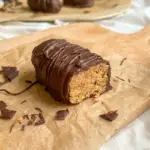
A crunchy, chocolate-dipped candy bar remake made with simple pantry ingredients, bold peanut butter flavor, and a sweet-salty finish. These bars taste nostalgic, look impressive, and store beautifully in the fridge or freezer.
- Prep Time: 10 minutes
- Freeze Time: 1 hour
- Total Time: 1 hour 10 minutes
- Yield: 12 butterfingers 1x
- Category: Dessert
Ingredients
Scale
- 1 cup peanut butter
- 1/3 cup honey
- 1/2 tsp vanilla extract
- 1/2 tsp sea salt
- 1 + 3/4 cup cornflake cereal
- 1 cup chocolate chips (dairy free, if needed)
- 1 tsp coconut oil
Instructions
- Gently warm the filling ingredients.
Set a saucepan over medium-low heat and add the peanut butter, honey, vanilla extract, and sea salt. Stir constantly as the mixture heats. Let it warm for about 2 to 4 minutes, just until it loosens up, looks smooth, and blends together easily. Keep the heat low enough that the mixture never scorches or bubbles aggressively. - Combine the cereal with the peanut butter mixture.
Place the cornflake cereal in a large mixing bowl. Pour the warm peanut butter mixture over the cereal, then stir until the cereal gets coated all over. As you stir, lightly press and crush some of the cereal with your spoon or spatula. That helps the mixture stick together and gives the bars their signature candy-bar texture. - Shape the mixture into logs.
Scoop up portions of the mixture and form them into short, log-like bars. Aim for about 12 to 14 logs total. Try to keep the pieces similar in size so they freeze and coat evenly later. Once shaped, arrange them on a plate or baking sheet lined with parchment paper. - Freeze until firm.
Transfer the tray or plate to the freezer and let the logs chill for about 1 hour. This step is important because it firms up the centers and makes dipping much easier. The bars should feel solid enough to handle without falling apart. - Melt the chocolate coating.
Add the chocolate chips and coconut oil to a microwave-safe bowl or a saucepan. Melt them slowly, stirring often, until the mixture turns smooth and glossy. If you use the microwave, heat in short intervals and stir between each one so the chocolate does not overheat or seize. - Dip each bar in chocolate.
Remove the frozen logs from the freezer one at a time. Dip each one into the melted chocolate and turn it until fully coated. Let any extra chocolate drip back into the bowl before placing the bar back onto the parchment-lined tray. Work steadily so the bars stay cold and firm while you coat them. - Let the coating set.
Once all the bars are dipped, return the tray to the freezer for about 10 minutes, or until the chocolate hardens. After that, the bars are ready to enjoy. Store them in the refrigerator or freezer for the best texture and freshness.
Find it online: https://irmacooks.com/healthy-homemade-butterfingers-2/
