Honeycomb Marshmallow Treats – Better Than Rice Krispie Treats
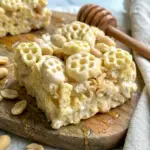
Melted marshmallows, honey-sweetened Honeycomb cereal, and salted peanuts come together in this quick, no-bake treat, finished with a touch of real honey for a salty-sweet, ooey-gooey bite that’s ready in minutes.
- Prep Time: 10 minutes
- Total Time: 10 minutes
- Yield: 12 servings 1x
- Category: Dessert
Ingredients
Scale
- 4½ cups Honeycomb cereal
- 1 (10 oz) bag mini marshmallows
- 1 cup roasted salted peanuts
- ¼ cup unsalted butter
- 2 tablespoons honey (add more for a stronger honey flavor)
Instructions
- Place a large saucepan over low heat and add the unsalted butter, letting it melt completely and evenly across the bottom of the pan. Keeping the heat low here helps prevent scorching in the next step.
- Once the butter has fully melted, add the mini marshmallows to the saucepan. Stir continuously and patiently over the low heat until the marshmallows melt down completely into a smooth, glossy mixture with no lumps remaining.
- Add the roasted salted peanuts and the honey directly into the melted marshmallow mixture. Stir everything together thoroughly until the peanuts and honey are evenly distributed throughout.
- Add the Honeycomb cereal to the saucepan all at once. Working quickly, stir the cereal into the marshmallow mixture, making sure every piece gets evenly coated. Move efficiently during this step, since the cereal can start to soften if it sits too long in the hot mixture.
- Immediately transfer the coated cereal mixture into an 8×8-inch baking pan that has been lined with parchment paper or lightly coated with non-stick spray. Using a piece of parchment paper, the back of a spatula, or lightly greased hands, press the mixture evenly and firmly into the pan, being careful not to press so hard that you crush the cereal pieces.
- Let the pan sit undisturbed at room temperature until the mixture has fully cooled and set, firming up enough to hold its shape when cut.
- Once completely cooled, lift the set mixture out of the pan using the parchment paper overhang if you used one, then cut it into squares. Serve and enjoy.
Nutrition
- Serving Size: 1grams
- Calories: 237kcal
- Sugar: 21g
- Sodium: 125mg
- Fat: 10g
- Carbohydrates: 35g
- Fiber: 2g
- Protein: 4g
- Cholesterol: 10mg
Find it online: https://irmacooks.com/honeycomb-marshmallow-treats/
