Easy Lemon Truffles Recipe – Healthy Easy Sweets You’ll Love!
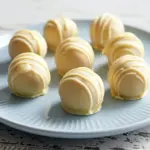
Got a craving for that tangy lemon drizzle cake flavor but can’t be bothered turning the oven on? These no-bake lemon truffles have your back. They’re bright, zesty, and melt-in-your-mouth creamy — basically sunshine disguised as dessert. Think of them as bite-sized lemon clouds with a silky white chocolate shell. Simple, wholesome, and downright addictive.
- Prep Time: 20 minutes
- Total Time: 20 minutes
- Yield: 8 truffles 1x
- Category: Dessert
Ingredients
Scale
For the Truffles:
- 1 cup ground almonds (or almond flour) – this gives our truffles structure and a soft, cake-like texture.
- ¾ cup desiccated (or shredded) coconut – adds that dreamy chewiness and subtle tropical flavor.
- 3 tablespoons refined coconut oil, melted – helps everything stick together once chilled; refined means no strong coconut flavor.
- Juice of 1 lemon – our tart, citrusy hero.
- ½ teaspoon lemon zest – extra zestiness for a flavor punch.
- 1 teaspoon vanilla extract or paste – gives warmth and balances the tang.
- ¼ cup maple syrup – just the right touch of natural sweetness.
- A pinch of salt – because even sweet things need a little contrast.
For the White Chocolate Coating:
- 100 g white chocolate (vegan or regular – your call!)
- 2 teaspoons coconut oil (optional but helpful) – makes the coating smoother and easier to dip.
Instructions
- Blitz That Coconut
- Grab your blender or food processor and pulse the desiccated coconut until it’s fine and floury, kind of like almond meal. This helps the truffles hold their shape better.
- Mix It All Together
- Transfer the ground coconut and almonds into a medium bowl. Toss in the salt and give it a quick stir.
- Now pour in the melted coconut oil, lemon juice, lemon zest, maple syrup, and vanilla extract. Stir everything until it starts to form a sticky, dough-like consistency. If it’s too dry, add a splash more lemon juice. Too wet? Sprinkle in a touch more almond flour.
- Roll ‘Em Out
- Scoop up a tablespoon of the mixture and roll it between your palms to form little balls. They should be bite-sized — perfect for a mid-afternoon pick-me-up or post-dinner treat.
- Arrange them on a parchment-lined plate or tray (something that fits in your freezer) and pop them in there for 15–20 minutes. This helps them firm up before dipping.
- Melt the Chocolate
- Time to give those truffles their irresistible outer shell!
- Melt your white chocolate gently using a Bain Marie (aka a heatproof bowl over a pot of simmering water). You can also zap it in the microwave in short bursts — just stir between each one so it doesn’t burn.
- Add a touch of coconut oil to make the chocolate extra smooth and glossy.
- Step 5: Dip, Drip, and Chill
- Take your chilled truffles from the freezer and dip each one into the melted chocolate. A fork and spoon combo works great for this — one for dipping, one for helping it drip off.
- Place each coated truffle back on the lined tray and let them set in the fridge for about 30 minutes.
- Once they’re set, they’re ready to devour.
Notes
- Too crumbly? Add a few drops of lemon juice or maple syrup until it comes together.
- Too sticky? Chill the mixture before rolling or lightly grease your hands with coconut oil.
- Want a deeper flavor? Use pure vanilla bean paste instead of extract.
- Prefer more zing? Up the zest or add a few drops of lemon extract.
