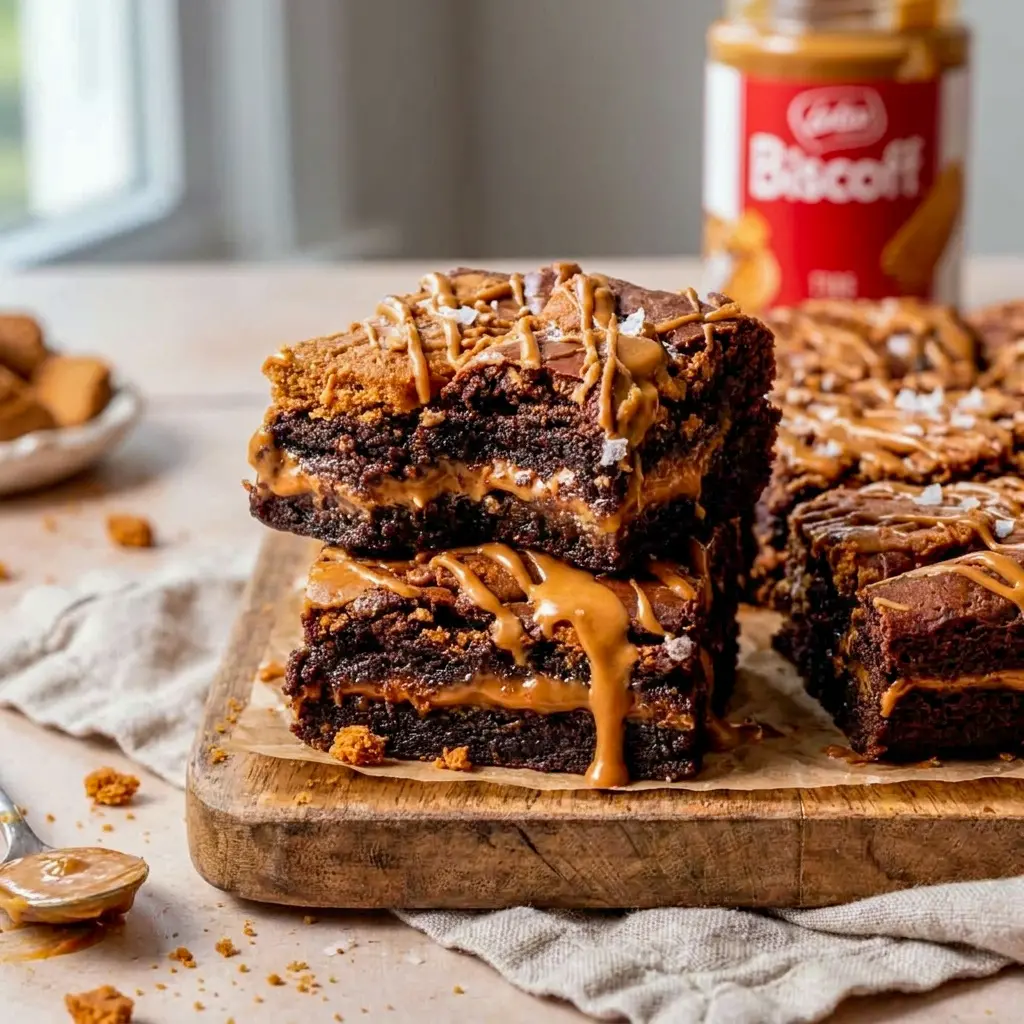
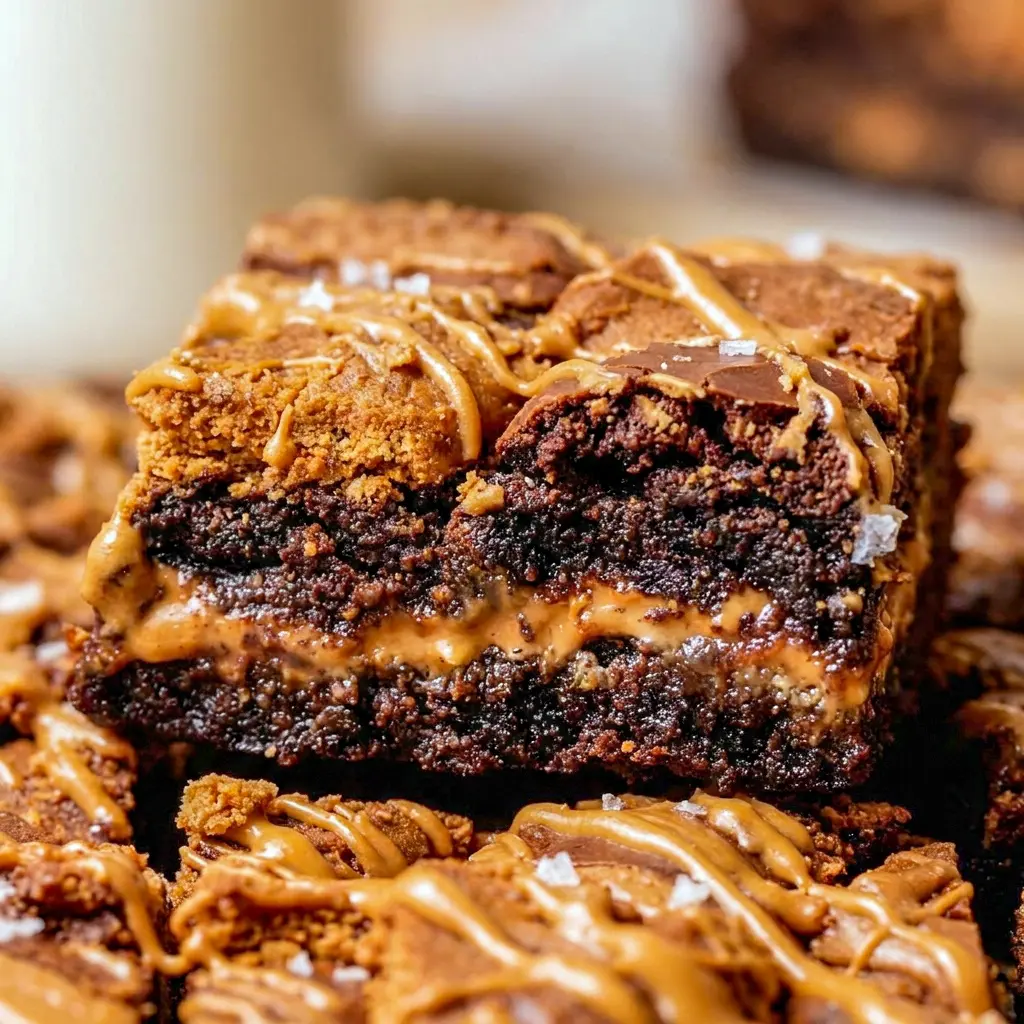
The first bite of Biscoff Brownies is the kind of dessert moment that makes people stop talking mid-chew. That rich chocolate top. That hidden ribbon of cookie butter in the middle. That warm, spiced, caramel-cookie flavor from the Biscoff cookies on top. It all works together like a very well-dressed dessert plot twist.
These Biscoff Brownies bring the best parts of a deep, fudgy brownie and wrap them around one of the most addictive ingredients in the dessert universe: cookie butter. The result tastes bold, cozy, and just a little bit over-the-top, which is exactly what brownies should be. They are not shy. They are not subtle. They show up with full dessert energy.
I love a brownie that knows what it is. These Biscoff Brownies are dense in the best way, chewy at the edges, gooey in the center, and layered with enough Biscoff flavor to make every square feel special. They also happen to be the kind of treat people remember. Bring these to a party and suddenly everyone is asking for the link, the recipe, and possibly your entire baking strategy.
This is one of those Biscoff Brownies Recipe moments where the title barely contains the actual experience. Chocolate meets cookie butter, cookie butter meets more cookie butter, and the whole thing bakes into a pan of pure chaos-in-the-best-way dessert. It is rich, layered, and deeply satisfying.
And yes, this Biscoff Brownie Recipe deserves a permanent place in your dessert rotation. It has the same kind of reliable, ultra-fudgy structure you want from a classic brownie, but the Biscoff layer turns it into something a little more dramatic. A little more memorable. A lot more fun.
Table of Contents
Why you will love these Biscoff Brownies
These brownies do not just taste good. They hit multiple dessert cravings at once.
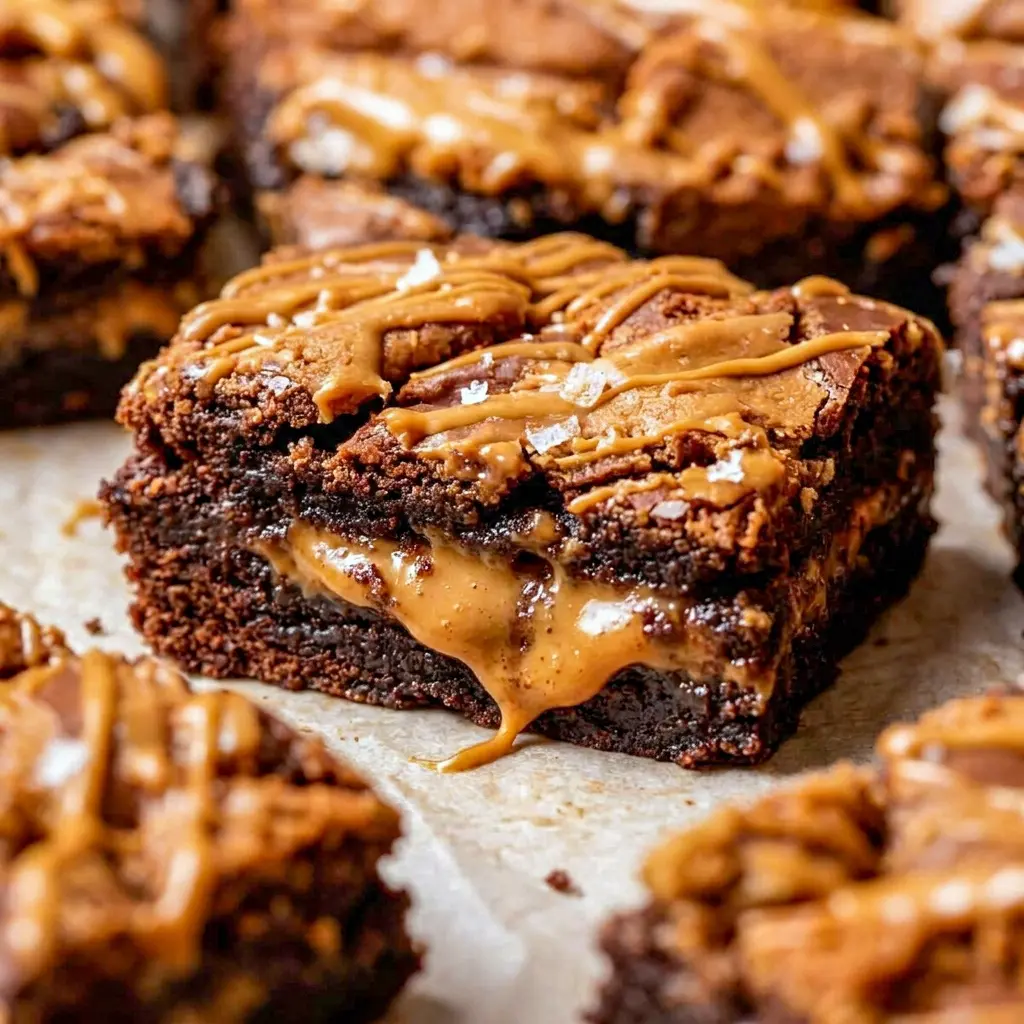
They start with a thick, chocolatey base that tastes like a proper brownie should. That alone would be enough for a good dessert. But then the Biscoff Brownies add a frozen layer of cookie butter in the center, which melts into the middle as they bake and turns into a gooey, spiced pocket of happiness.
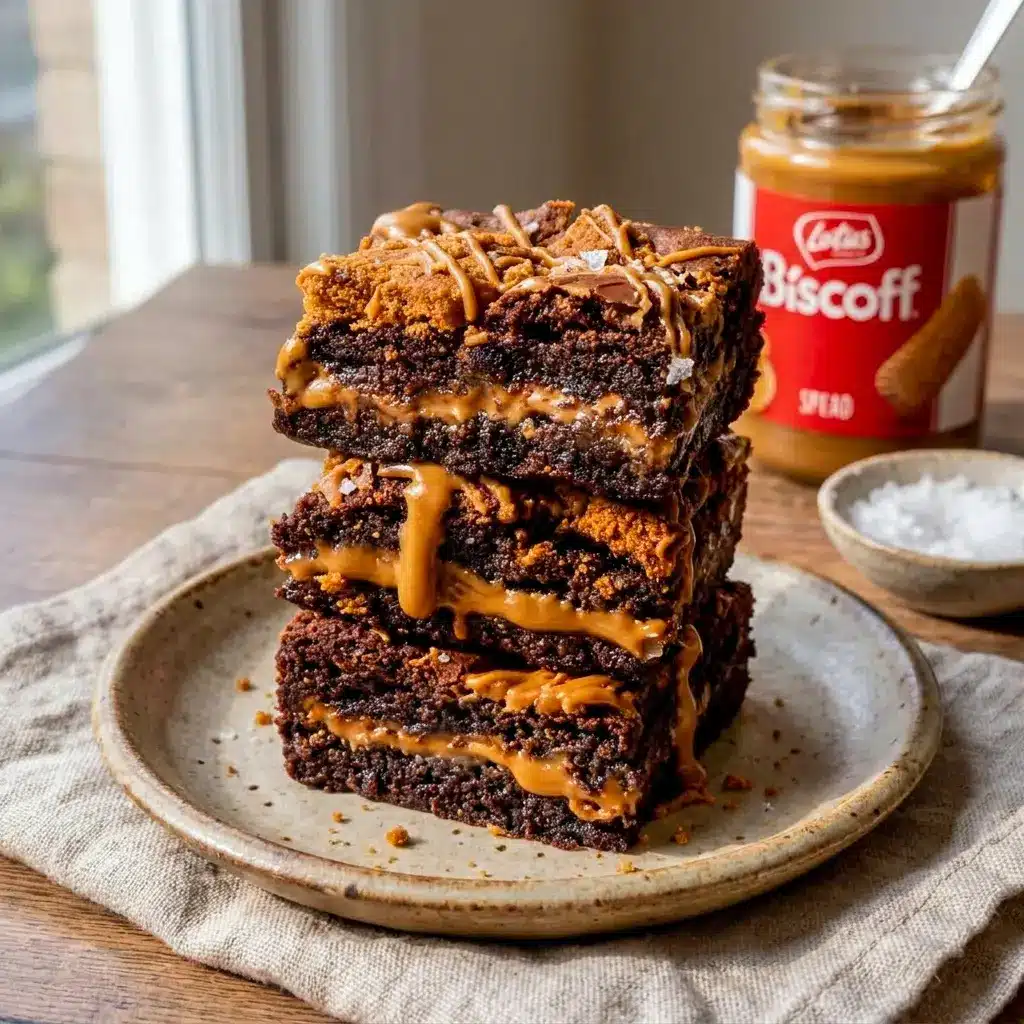
The top finishes the whole thing off with crushed Biscoff cookies and a drizzle of warmed cookie butter. That means you get texture, flavor, and a little bit of visual drama all in one pan. These are the kind of Cookie Butter Brownies that look impressive without requiring anything fussy or complicated.
They also have the kind of texture brownie lovers chase. The chocolate base stays fudgy because the recipe uses a smart balance of butter, chocolate, cocoa powder, and an extra egg yolk. That extra yolk matters. It adds richness and keeps the center soft and gooey.
And then there is the flavor. Biscoff Brownies have that warm, brown sugar, spiced-cookie flavor that makes Biscoff so recognizable. It feels cozy without tasting seasonal-only. You can make them in winter, bring them to summer potlucks, or stash them in the freezer for emergency dessert situations.
The Key Ingredients (and Why You Need Them)
Below I list the core ingredients without amounts so you can understand the role each one plays. The printable recipe card has the exact measurements, but this breakdown will help you see why the recipe works.
- Biscoff cookie butter
This is the star of the show. It creates the gooey center and gives these Biscoff Brownies their unmistakable flavor. It tastes like spiced caramelized cookies turned into a spreadable dessert dream. - Brown sugar
Brown sugar adds moisture, chewiness, and a deeper caramel note. It helps the brownie base taste rich instead of flat. - Granulated sugar
This supports the structure and helps create that classic shiny brownie top. It also balances the depth of the brown sugar. - Eggs and an extra egg yolk
The eggs provide structure, while the extra yolk adds richness and softness. That yolk is a small move with a big payoff, especially in Biscoff Brownies that need to stay gooey. - Vanilla extract
Vanilla rounds out the chocolate and Biscoff flavors. It adds warmth and keeps the brownies from tasting one-dimensional. - Unsalted butter
Butter carries the chocolate flavor and keeps the texture tender. It helps create that dense, fudgy brownie crumb people crave. - Semi-sweet chocolate chips
These melt into the base and give the brownies their deep chocolate backbone. They are essential for that rich, melt-in-your-mouth texture. - Unsweetened Dutch cocoa powder
Dutch cocoa gives the brownies a more intense chocolate flavor and a dark, luxurious color. It is one of the reasons these Biscoff Brownies taste so bold. - All-purpose flour
Flour provides structure, but not too much. You want enough to hold everything together without turning the brownies cakey. - Espresso powder
This is optional, but strongly recommended. It does not make the brownies taste like coffee. It simply makes the chocolate taste bigger and deeper. - Fine sea salt
Salt sharpens the flavor and keeps the sweetness in check. It makes both the chocolate and cookie butter taste more defined. - Biscoff cookies
These go on top and give the brownies crunch, texture, and extra cookie flavor. They also make the finished pan look irresistible.
How to Make It
The process for Biscoff Brownies is simple, but the order matters. Each step builds the texture and helps the cookie butter layer stay gooey.
1) Freeze the cookie butter layer
Start by lining a square 8×8 metal baking pan with parchment paper. Leave enough paper hanging over the sides so you can lift the brownies out later. Then press a separate piece of parchment into the shape of the pan and spread the Biscoff cookie butter evenly inside the creased outline.
Place that cookie butter layer in the freezer until it becomes completely firm. This step matters more than it sounds like it should. A solid frozen layer makes it easier to stack the brownies and helps the center stay distinct during baking.
2) Prepare the pan and oven
Line the baking pan with parchment paper again, making sure the paper hangs over all four sides. This gives you an easy lift later and keeps the brownies from sticking. Preheat the oven to 350°F / 180°C.
3) Whisk the sugars, eggs, and vanilla
In a mixing bowl, whisk together the brown sugar, granulated sugar, eggs, egg yolk, and vanilla extract. Keep whisking until the mixture turns thick and lighter in color. This step helps create the structure and that glossy brownie top.
4) Melt the butter and chocolate
In another bowl, melt the butter and chocolate chips together until smooth. You can do this in the microwave in short bursts or over gentle heat on the stove. Once melted, whisk in the cocoa powder until the mixture looks glossy and smooth.
Then whisk the chocolate mixture into the egg mixture. Do this slowly and mix just until combined. You want the batter cohesive, not beaten into submission.
5) Fold in the dry ingredients
Add the flour, espresso powder, and salt. Use a rubber spatula to fold the dry ingredients into the brownie batter until no dry streaks remain.
Do not overmix. That is one of the fastest ways to lose the fudgy texture that makes Biscoff Brownies so good.
6) Assemble the layers
Pour about half of the brownie batter into the prepared pan and spread it into an even layer. Take the frozen cookie butter square out of the freezer, peel away the parchment, and place the layer on top of the batter.
Pour the remaining brownie batter over the cookie butter layer and spread it gently to the edges. The frozen layer should stay mostly intact and create that gooey middle once baked.
7) Add the topping and bake
Break the Biscoff cookies into pieces and scatter them over the top of the brownie batter. Warm a little extra cookie butter just until it becomes pourable, then drizzle it over the top.
Bake until the center is set but still a little soft. A toothpick inserted into the middle should come out with a few moist crumbs, not wet batter and not totally clean. That crumbly middle is the sweet spot for Biscoff Brownies.
8) Cool completely before cutting
Let the brownies cool fully in the pan on a wire rack. This part takes patience, but it pays off. Cooling helps the brownies set and makes cleaner slices possible.
Once cool, lift the brownies out using the parchment paper and cut into squares. Add a little more cookie butter on top if you want extra drama.
Tips for Perfect Biscoff Brownies
Use a kitchen scale.
This is the easiest way to get consistent results. Baking becomes much more reliable when the flour and cocoa are measured precisely.
Freeze the Biscoff layer until truly firm.
Do not rush this. If the layer is not completely solid, it can stick to the parchment and make assembly messier.
Use a metal pan.
A metal pan bakes more evenly and predictably than glass or ceramic. That matters for brownies, especially ones that need a fudgy center like these Biscoff Brownies.
Do not overbake.
The brownies should finish with moist crumbs on the toothpick. A clean toothpick usually means the brownies went too far.
Measure flour carefully.
Do not scoop directly from the bag. Spoon the flour into your measuring cup or weigh it for the most accurate result.
Let them cool all the way.
Warm brownies are tempting, but fully cooled brownies slice better and taste more balanced.
Variations to try
These Biscoff Brownies already have a lot going on, but there is room to play.
Add chopped Biscoff cookies into the batter.
This gives extra crunch throughout the brownie instead of only on top.
Swap in dark chocolate chips.
That makes the brownie base a little more intense and less sweet.
Add flaky salt on top.
A tiny sprinkle of salt on the finished brownies makes the cookie butter flavor pop.
Use milk chocolate drizzle.
If you want a sweeter finish, drizzle melted milk chocolate over the top after baking.
Make them extra gooey.
Pull them from the oven at the first sign of set centers and let the residual heat finish the job.
Best ways to serve Biscoff Brownies
These brownies can absolutely stand alone, but a few serving ideas make them even more fun.
Serve them slightly warm with vanilla ice cream. That contrast of cold ice cream and gooey brownie is basically unbeatable.
Pair them with coffee or espresso. The chocolate and Biscoff flavors play really well with a bitter drink.
Cut them into small squares for a dessert tray. These are rich, so smaller pieces often go further than you expect.
Drizzle with more cookie butter before serving if you want maximum Biscoff energy. This is not the time to be shy.
For a party, stack them on a plate with extra crushed cookies on top. They look polished without any real effort.
Storage and freezing
Biscoff Brownies store very well, which makes them excellent for baking ahead.
Keep leftovers in an airtight container at room temperature for 2 to 3 days. They stay soft and fudgy if you seal them properly.
For longer storage, freeze the brownies in an airtight container or freezer bag for up to 1 month. Thaw them at room temperature before serving.
If you want the cleanest texture after freezing, let them thaw fully and then warm them briefly before eating.

FAQs about Biscoff Brownies
Where can I buy Biscoff cookie butter?
You can usually find it in the peanut butter aisle at grocery stores. It is also available from Amazon and sometimes under the name Speculoos Spread.
What is Biscoff made from?
Biscoff comes from Speculoos cookies, which are crisp, buttery cookies with a warm spiced flavor similar to gingerbread.
How do I know when the brownies are done?
Use a toothpick in the center. It should come out with a few moist crumbs attached. That means the brownies are baked but still fudgy.
What is the best way to cut brownies?
Let them cool completely first. Then run a sharp knife under hot water, wipe it dry, and cut cleanly between slices.
Can I make these ahead of time?
Absolutely. In fact, Biscoff Brownies often slice better after they have rested, so making them ahead works beautifully.
Final thoughts
There is a lot to love about Biscoff Brownies, but the biggest reason might be this: they feel like a dessert with a point of view. They are rich, gooey, deeply chocolatey, and packed with that warm cookie butter flavor that makes Biscoff so addictive. Every layer earns its place.
This is the kind of Biscoff Brownie Recipe that delivers a real payoff. The brownie base stays fudgy, the center melts into a soft cookie butter layer, and the top gives you crunch and extra flavor from the cookies. It tastes like a bakery treat but feels totally doable at home.
And that is why Biscoff Brownies are such a keeper. They are dramatic in the best way, simple enough to make on a normal day, and impressive enough to serve when you want people to remember dessert for the rest of the night.
Follow me on Pinterest for daily new recipes.
Gooey Biscoff Brownies Recipe | Ultra Fudgy Cookie Butter Brownies
These Biscoff Brownies combine a deep chocolate brownie base with a frozen cookie butter center and a crunchy Biscoff topping for a rich, gooey, dessert-loaded treat.
- Prep Time: 20 minutes
- Cook Time: 35 minutes
- Total Time: 55 minutes
- Yield: 16 servings 1x
- Category: Dessert
- Diet: Vegetarian
Ingredients
- 3/4 cup Biscoff cookie butter
- 1/2 cup packed light or dark brown sugar
- 1/2 cup granulated sugar
- 2 large eggs
- 1 large egg yolk
- 1 tablespoon vanilla extract
- 10 tablespoons unsalted butter
- 2/3 cup plus 1/4 cup semi-sweet chocolate chips
- 1/4 cup unsweetened Dutch cocoa powder
- 2/3 cup plus 1 tablespoon all-purpose flour
- 1 teaspoon espresso powder
- 1/2 teaspoon fine sea salt
- 4 to 5 Biscoff cookies, for the top
- Extra cookie butter, for drizzling
Instructions
Take a large sheet of parchment paper and press it into a square 8×8 metal baking pan, making sure the paper creases along the bottom edges so you can see the pan’s shape. Spread the Biscoff cookie butter evenly inside that outlined square. Place it in the freezer and let it firm up completely before making the brownie batter. This step is important because a fully frozen layer holds its shape much better during assembly and baking.
2) Line the pan and heat the ovenOnce the cookie butter layer is firm, line the baking pan with parchment paper again, leaving extra paper hanging over all four sides for easy lifting later. Preheat the oven to 350°F / 180°C so it is ready when the batter is assembled.
3) Mix the sugars, eggs, and vanillaIn a medium mixing bowl, whisk together the brown sugar, granulated sugar, eggs, egg yolk, and vanilla extract. Continue whisking until the mixture looks pale, thick, and well blended. This creates the base that helps the brownies bake up with a glossy top and rich texture.
4) Melt the chocolate mixturePlace the butter and chocolate chips together in a microwave-safe bowl or a small saucepan. Heat gently until everything melts into a smooth mixture, stirring as needed so it does not scorch. Whisk in the cocoa powder until the chocolate mixture looks fully combined and silky.
5) Combine the chocolate and egg mixtureSlowly pour the melted chocolate mixture into the bowl with the eggs and sugar, whisking the whole time. Mix only until the batter comes together and looks smooth. Do not overwork it, because you want these Biscoff Brownies to stay dense and fudgy rather than airy.
6) Fold in the dry ingredientsAdd the flour, espresso powder, and salt to the bowl. Use a spatula to gently fold everything together until the flour disappears and the batter looks uniform. Stop as soon as the dry streaks are gone. Overmixing can make the brownies tougher and less fudgy.
7) Layer the batter and cookie butterScoop about half of the brownie batter into the prepared pan and spread it evenly to the edges. Remove the frozen cookie butter layer from the freezer, peel off the parchment, and set the solid square over the batter.
Spread the rest of the brownie batter over the top of the cookie butter layer, smoothing it outward so the layer is covered evenly from edge to edge.
8) Add the toppingsBreak the Biscoff cookies into pieces and press them gently over the brownie batter. Warm a couple of tablespoons of extra cookie butter in the microwave for 15 to 20 seconds, just until it becomes loose and drizzly. Spoon or drizzle that over the top of the brownies for extra Biscoff flavor.
9) Bake the browniesBake the pan in the preheated oven for 30 to 40 minutes. The brownies are ready when a toothpick inserted in the center comes out with a few moist crumbs attached. It should not come out clean, because that usually means the brownies are overbaked. The center should still feel soft and slightly fudgy.
10) Cool and serve
Set the pan on a wire rack and let the brownies cool completely before trying to lift or cut them. Once fully cool, remove them using the parchment overhang. Add more warmed cookie butter on top if you want, then slice into squares and serve.
Notes
Storage
Store leftover brownies in an airtight container at room temperature for 2 to 3 days. For longer keeping, freeze them in a sealed freezer bag or container for up to 1 month.
Notes
For the best texture, measure the flour carefully. Do not scoop it directly from the bag. Spoon it into the measuring cup or weigh it for accuracy. Once the brownies are fully cool, use a sharp knife warmed under hot water and wiped dry between cuts to get neat, clean squares.