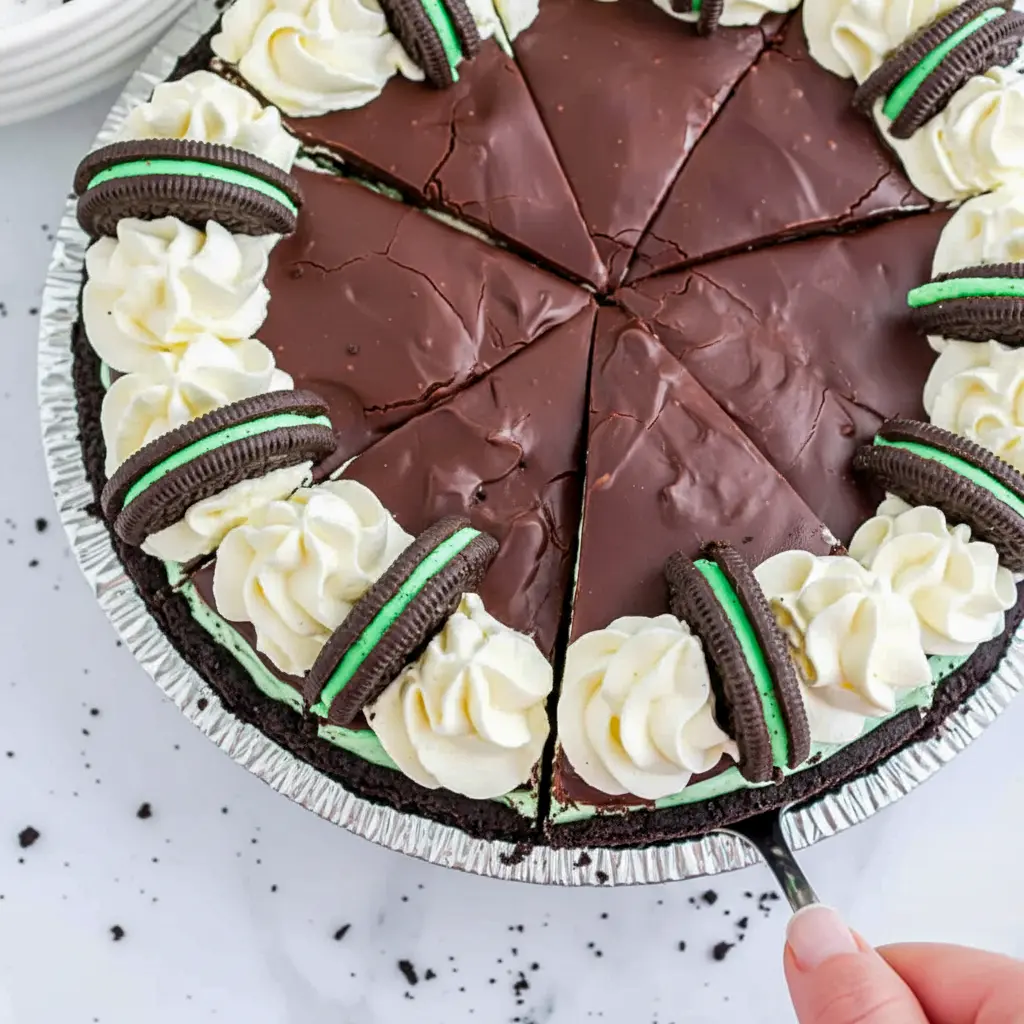
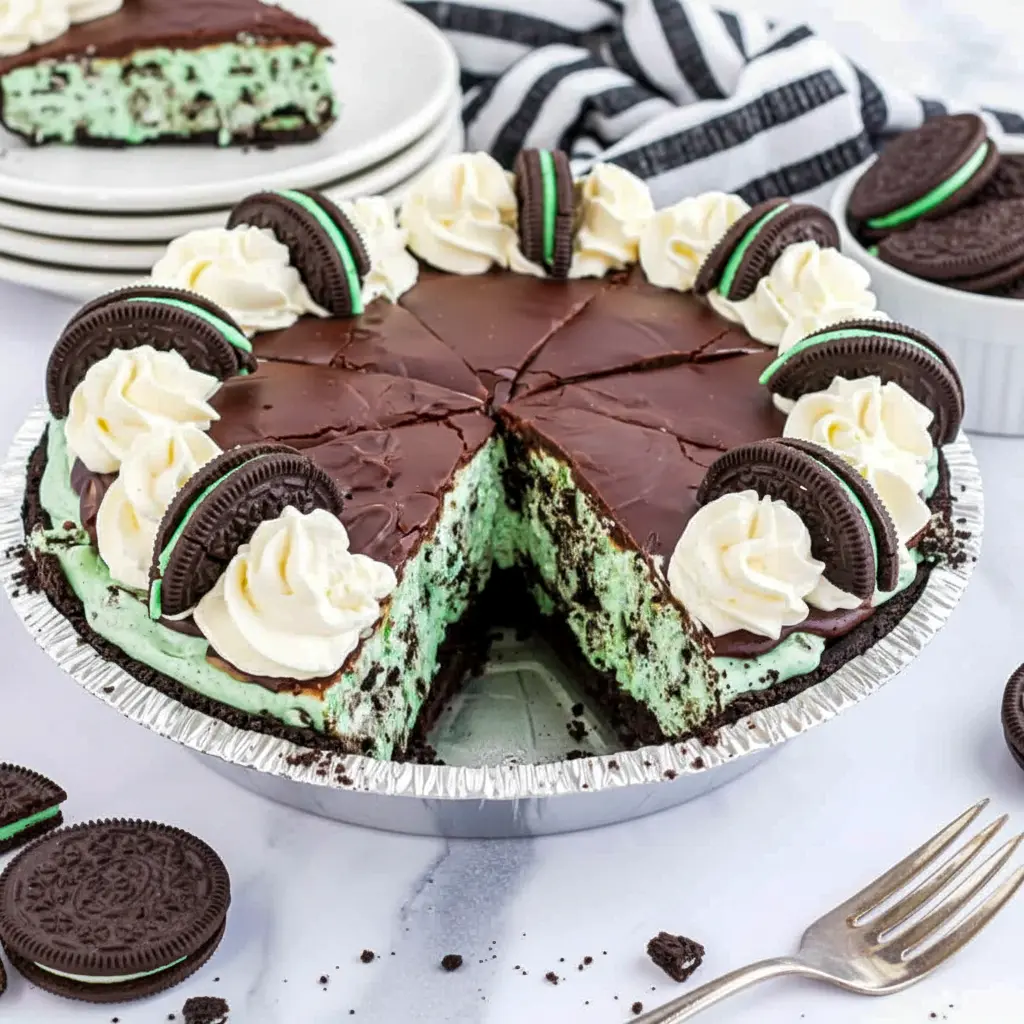
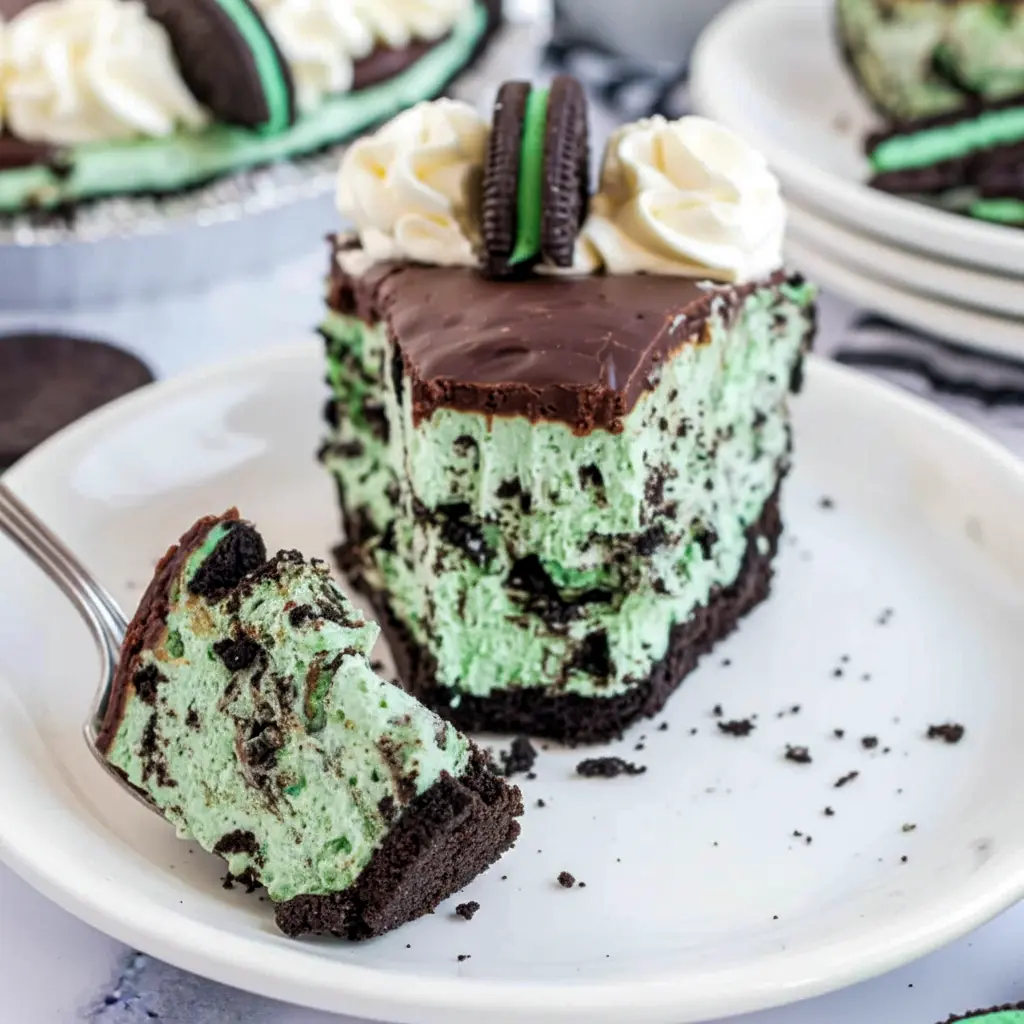
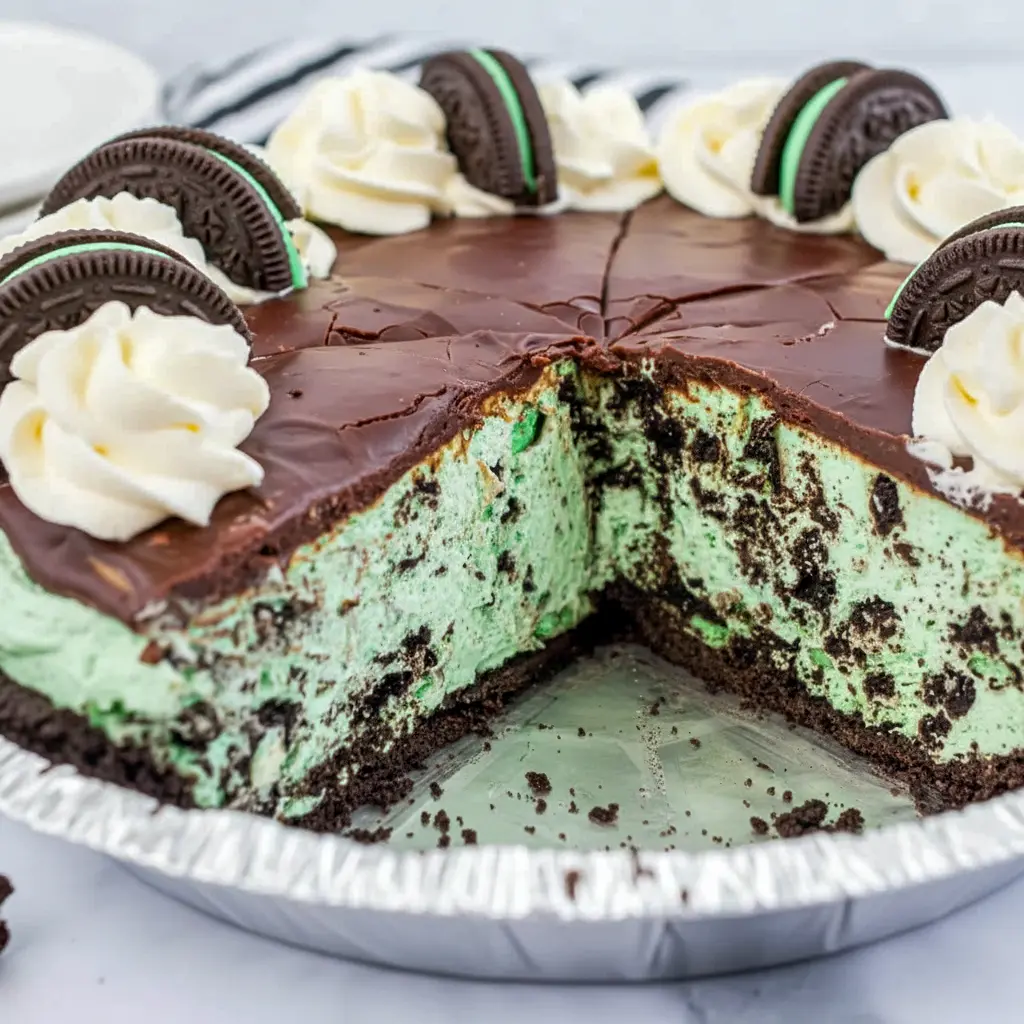
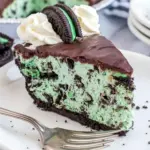
Grasshopper Pie has a way of making people light up before they even take a bite. The color shows up first, all cool mint green and chocolate-dusted drama. Then the Oreo crust, the creamy filling, and that glossy chocolate topping step in and finish the job. Suddenly, everyone at the table goes quiet for the best possible reason.
This is the kind of dessert that looks like you worked hard, even though Grasshopper Pie only asks for a small amount of effort and a little patience in the fridge. That is the sweet spot for a no-bake dessert. You get something impressive enough for guests, easy enough for a weeknight, and nostalgic enough to feel like a classic the moment it hits the table.
I love how Grasshopper Pie blends mint, chocolate, and cheesecake into one cold, silky dessert. It feels playful without being childish. Rich without being heavy. Fancy without being fussy. That is a rare trio, and this recipe knows exactly how to use it.
Table of Contents
Why You’ll Love This Grasshopper Pie
There are plenty of reasons to keep Grasshopper Pie in the dessert rotation, and the first one is simple: no oven required. That alone makes life easier. No preheating. No worrying about cracks. No hovering around a hot oven hoping the filling behaves itself.
The second reason is texture. Grasshopper Pie gives you a crunchy Oreo crust, a fluffy cheesecake filling, crushed mint cookies for contrast, and a smooth chocolate topping that seals the whole thing together. Every bite changes a little, and that keeps it interesting.
The third reason is how fast it comes together. You can put this Grasshopper Pie in the fridge in about 15 minutes, then let it chill while you do literally anything else. Finish dinner. Set the table. Pretend you are organized. The refrigerator does the rest.
It also fits so many occasions. Serve it as a Simple St. Patrick’s Day Dessert, bring it to a family gathering, or make it when you want a cool minty treat in warm weather. Grasshopper Pie does not need a holiday to justify itself, but it absolutely knows how to show up for one.
And yes, this dessert is very much in the lane of Grasshopper Cheesecake No Bake recipes that people save, pin, and make again later. It is also a great fit if you love Grasshopper Dessert ideas with a little extra flair.
The Key Ingredients (and Why You Need Them)
Below I list the main components without measurements so you can see what each part does in the recipe. That makes it easier to understand the structure and adjust the filling, crust, or topping with confidence.
- Oreo pie crusts give Grasshopper Pie a chocolatey, crunchy foundation. You can use store-bought crusts for convenience or make your own if you want a more homemade touch.
- Cream cheese forms the rich base of the filling. Make sure it softens first so the mixture blends smoothly and stays lump-free. That is one of the easiest ways to improve the final texture.
- Sweetened condensed milk sweetens the filling and gives it a thick, silky body. It also helps the dessert set with that luscious cheesecake feel people expect from Grasshopper Cheesecake style desserts.
- Mint Oreo cookies add flavor and texture. Some get crushed into the filling, while others can decorate the top if you want extra visual punch. Thin Mints also work well if you want a slightly different mint cookie profile.
- Mint extract brings the cool mint flavor front and center. Use pure mint extract for the cleanest flavor. A little goes a long way, which is a relief because mint can get bossy fast.
- Green food coloring gives Grasshopper Pie its signature color. You can skip it if you want the filling to stay pale, but the classic green look definitely gives it that retro dessert charm.
- Cool Whip lightens the filling and makes it fluffy. It folds in easily and keeps the pie airy instead of dense. If you prefer, homemade whipped cream works too.
- Chocolate chips and heavy cream create the ganache topping. Together they form a glossy finish that makes Grasshopper Pie Recipe With Oreos feel extra polished. That chocolate layer is not just decoration; it brings the whole dessert into focus.
How to Make It
Making Grasshopper Pie is wonderfully straightforward. The steps are simple, but the final result tastes like something far more involved.
- Start by crushing the mint cookies. Put them in a zip-top bag and crush them until you have a mix of small crumbs and a few slightly larger pieces. Do not pulverize them into dust. A little texture keeps the filling more interesting.
- In a large mixing bowl, beat the softened cream cheese with the sweetened condensed milk. Let it mix for a few minutes until the texture becomes smooth, creamy, and fluffy. This is where the base of Grasshopper Pie starts to take shape.
- Add the mint extract and green food coloring. Stir until the color spreads evenly and the mixture looks minty and inviting. This is the moment where the dessert starts to look like the dessert you had in mind.
- Fold in the Cool Whip gently. Do not whip aggressively like the bowl owes you money. A light hand keeps the filling airy. Then fold in the crushed mint cookies so the filling gets those chocolatey little surprises throughout.
- Spoon the mixture evenly into the Oreo pie crusts. Divide it carefully so both pies get the same amount. Smooth the tops with a spatula.
- For the ganache, heat the chocolate chips and heavy cream together in a microwave-safe bowl. Warm it in short bursts, stirring each time, until the mixture turns glossy and smooth. Let it cool for a few minutes before spreading it over the pie.
- Spread the chocolate topping over the cheesecake layer. Be generous. Grasshopper Pie deserves that rich chocolate finish, and the topping helps create that gorgeous contrast between mint and chocolate.
- Chill the pies for at least 3 hours, or overnight if you want cleaner slices and a firmer set. When ready to serve, slice and enjoy the cold, creamy layers of Easy No Bake Grasshopper Pie at their best.
Pro Tips for Perfect Results
A few small details make Grasshopper Pie even better.
- Soften the cream cheese first. Cold cream cheese leaves lumps, and lumps do not belong in a smooth no-bake filling. Let it sit out before mixing.
- Chill long enough. Three hours is the minimum, but overnight gives the cleanest slice. Do not rush the fridge step if you want the best texture.
- Use pure mint extract. Imitation mint flavor can taste sharp or artificial. Pure mint keeps the flavor cool and clean.
- Let the ganache cool slightly before spreading. Hot ganache can melt the filling, and that gets messy fast. A brief rest fixes the problem.
- Fold gently. This keeps the filling airy and light, which is exactly what you want in Grasshopper Cheesecake No Bake dessert.
- Taste the mint carefully. Mint extract can take over quickly. Start conservatively and keep the flavor balanced.
Variations to Try
Once you have the base version down, Grasshopper Pie becomes easy to customize.
- For a more cookie-heavy version, add extra crushed Mint Oreos on top. That gives the pie a little more crunch and makes the surface look even more dramatic.
- For a slightly different spin, use Thin Mints instead of Mint Oreos. That variation leans into a deeper chocolate-mint flavor and feels especially good if you want a stronger cookie bite.
- If you want a more classic Chocolate Grasshopper Pie, increase the chocolate topping a little and keep the mint flavor a touch lighter. That way the chocolate takes the lead without losing the dessert’s signature personality.
- You can also make this in a 9×13 dish instead of pie plates. That turns Grasshopper Pie into easy squares, which makes serving faster and easier for groups. It also works well for potlucks and casual parties.
- If you want a slightly different presentation, top the pie with whipped cream swirls, Andes mints, or extra cookie crumbs. These small touches make it look bakery-level without making the recipe harder.
Best Ways to Serve It
Grasshopper Pie tastes best chilled, straight from the fridge. The cold keeps the filling firm and the chocolate topping smooth.
Serve it in neat slices with a little extra whipped cream if you want a more polished dessert plate. That works especially well for parties or holiday dinners.
If you are making it for St. Patrick’s Day Pudding Dessert tables, add green decorations, mint cookie crumbs, or a few chocolate shavings on top. The color practically does the styling for you.
This pie also works well as a make-ahead dessert for guests. Since it needs time to set, it actually benefits from being made in advance. That is always a win.
And honestly, Grasshopper Pie is the kind of dessert people remember after the meal ends. They may not remember the side dishes. They will remember the pie.
Storage and Leftovers
Store Grasshopper Pie covered in the refrigerator for up to 4 days. The crust will stay crisp enough, and the filling will hold its shape nicely.
To freeze it, wrap the pie tightly in plastic wrap and then in foil. It keeps well for up to 3 months. That makes it a smart option if you want to make one pie now and save the second one for later.
When you are ready to serve a frozen pie, let it thaw in the refrigerator overnight. That gives it time to soften without getting watery.
If you slice the pie before freezing, place pieces in a single layer first until firm, then wrap them individually. That makes it easier to grab a piece whenever the craving hits. Very practical. Very dangerous.
This is one of those desserts that fits beautifully into Grasshopper Cheesecake Recipe searches because it stores well and serves well without any fuss.
FAQs
Is Grasshopper Pie the same as Grasshopper Cheesecake?
They are very similar. Grasshopper Pie usually refers to a no-bake mint cheesecake-style pie, often with an Oreo crust and chocolate topping. The wording changes, but the dessert family stays the same.
Can I make Grasshopper Pie ahead of time?
Absolutely. In fact, it gets better after chilling. Make it the day before if you want the cleanest slices and easiest serving.
Can I skip the green food coloring?
Yes. The flavor stays the same, even without the color. The pie will just look more pale and less traditional.
Can I use homemade whipped cream instead of Cool Whip?
Yes. Homemade whipped cream works nicely and gives the filling a more from-scratch feel. Just make sure it is whipped to soft peaks before folding it in.
Can I make Grasshopper Pie Recipe With Oreos in a dish instead of pie pans?
Definitely. A 9×13 dish works well if you want Grasshopper Pie bars or squares. That is especially useful for parties and potlucks.
Is this dessert good for holidays?
Very. It is especially popular as a Simple St. Patrick’s Day Dessert, but it also works year-round for birthdays, gatherings, and weekend desserts.
Final Thoughts
Grasshopper Pie is one of those desserts that never really goes out of style because it knows exactly what it is supposed to be. Cool mint, creamy cheesecake, crunchy chocolate crust, and a smooth ganache topping all work together in a way that feels playful and polished at the same time.
It is also an easy win. You do not need to bake. You do not need to overthink it. You just need a few smart ingredients, some chill time, and a little patience while the fridge does its job. That makes Grasshopper Pie a strong choice for holidays, summer nights, and everything in between.
Whether you call it Grasshopper Cheesecake No Bake, Grasshopper Cheesecake, or simply Grasshopper Pie, the result stays the same: a cold, creamy dessert that people keep reaching for until the plate disappears. That is usually a sign you did something right.
Follow me on Pinterest for daily new recipes.
Easy No Bake Grasshopper Pie | Creamy Mint Chocolate Cheesecake
This no-bake grasshopper pie blends creamy mint cheesecake filling, crushed mint Oreos, and a smooth chocolate topping inside a chocolate cookie crust. It is quick to assemble, easy to chill, and perfect for make-ahead dessert planning.
- Prep Time: 15 minutes
- Cook Time: 3 hours
- Total Time: 3 hours 15 minutes
- Yield: 16 slices 1x
- Category: Dessert
- Cuisine: American
Ingredients
- 2 chocolate Oreo pie crusts
For the filling
- 24 Mint Oreo cookies or Girl Scout Thin Mints, divided
- 3 packages cream cheese, softened, 8 ounces each
- 1 can sweetened condensed milk, 14 ounces
- 5 drops green food coloring
- 1 teaspoon mint extract
- 12 ounces Cool Whip, thawed, divided
For the topping
- 1 cup semi-sweet chocolate chips
- 5 tablespoons heavy whipping cream
Instructions
- Place the mint Oreo cookies in a zip-top bag and crush them until they are broken into small pieces. Leave some larger crumbs in the mix so the filling has a little texture instead of turning into powder. Set the crushed cookies aside for later.
- In a large mixing bowl, beat the softened cream cheese together with the sweetened condensed milk. Mix for about 3 minutes, or until the mixture becomes smooth, fluffy, and free of lumps. This step builds the creamy base of the pie.
- Add the green food coloring and mint extract to the cream cheese mixture. Stir until the color blends evenly and the mint flavor is distributed throughout the filling.
- Fold in the thawed Cool Whip gently. Once it is mostly incorporated, add the crushed mint Oreo cookies and continue folding until everything is evenly mixed. Be careful not to stir too aggressively, or the filling will lose some of its airy texture.
- Divide the filling evenly between the two prepared chocolate Oreo pie crusts. Use a spoon or spatula to smooth the top so the filling reaches the edges evenly.
- In a small microwave-safe bowl, combine the chocolate chips and heavy cream. Heat for 30 seconds, then stir. Continue heating in 15-second intervals, stirring each time, until the mixture is fully melted and smooth.
- Let the chocolate topping cool for about 5 minutes before spreading it over the pies. This helps prevent the chocolate from melting into the filling and keeps the top layer neat.
- Spread the chocolate evenly over the top of each pie. Cover the surface fully or leave a few swirls if you like a more rustic finish.
- Refrigerate the pies for at least 3 hours, or overnight if you want the cleanest slices and firmest set. Chilling allows the filling to become sliceable and gives the flavors time to settle together.
- Before serving, garnish with extra Cool Whip, crushed Oreos, or Andes mints if desired. Slice and serve cold.
Notes
- This recipe makes two pies, which is ideal for sharing or freezing one for later.
- You can use store-bought Oreo pie crusts or make a homemade chocolate Oreo crust if you prefer.
- For a different presentation, you can skip pie plates and make the dessert in a 13×9-inch baking dish instead.
- To freeze, wrap the pies tightly in plastic wrap and then foil. Freeze for up to 3 months. Thaw in the refrigerator overnight before serving.
- For the best texture, use full-fat block cream cheese and let it soften before mixing.
- Extra toppings like whipped cream, mint cookies, or Andes mints make the dessert look more finished and festive.
Nutrition
- Serving Size: 1 slice
- Calories: 381kcal
- Sugar: 26g
- Sodium: 235mg
- Fat: 25g
- Carbohydrates: 34g
- Fiber: 1g
- Protein: 7g
- Cholesterol: 61mg